Learn How to Create 3D Characters for Animation Step by Step
Getting started with 3D character animation can feel like a lot to take in. You might look at animated characters in films, games, or online clips and wonder exactly how they came to life. Do you need to be good at drawing? Is expensive software required? And how do artists take a static 3D model and make it feel like a living, breathing performer?
The good news is that beginners today have more options than ever. Affordable tools, free tutorials, and even AI-assisted workflows mean you can dive in without a professional background. What really counts is grasping the overall process and learning to view characters as moving actors, not just objects to look at.
This guide is aimed at beginners who want a straightforward, realistic look at creating 3D characters for animation. It walks through the entire workflow, explains why each step matters, and points out common mistakes that trip up newcomers. By the time you finish, you should have a clear sense of how animated characters are made and how to start building your own with confidence.
What Makes a 3D Character Different From a Static 3D Model?
One key idea for beginners to grasp is that not every 3D model works for animation. A character that looks fantastic in a still render can fall apart the moment it begins to move.
Characters built for animation are planned around motion. Their proportions, joint placement, and geometry are all set up so the character can bend, twist, and stretch naturally. Arms need room to lift, knees have to flex smoothly, and the torso should handle rotation without breaking down.
That's why creating characters for animation differs from making a display model. Details that look great in stills, like extremely thin limbs or elaborate accessories, often cause headaches during rigging and animation. Beginners who learn this early on save themselves a lot of trouble later.
Understanding the Full Character Creation Pipeline
Before you open any software, it's worth understanding the full path a character takes from idea to animation. While the tools may vary, the core process stays the same.
Most animated characters go through these stages:
-
Character planning and reference gathering
-
Modeling the character's form
-
Adding materials and textures
-
Rigging the character for movement
-
Animating motion and expressions
Each step builds on the one before it. Skipping planning often leads to off proportions. Rushing modeling creates rigging issues. Ignoring animation tests means problems stay hidden until they're hard to fix.
Planning Your First Character the Right Way
Planning doesn't require polished drawings. It's about deciding what kind of character you're making and what it needs to do.
Beginners should ask a few simple but key questions:
-
Is this character realistic or stylized?
-
Does it need to walk, run, or gesture?
-
Is it for practice, a short animation, or a game?
References are a must. Photos, movie stills, game screenshots, and rough sketches all help guide proportions and design. References cut down on guesswork and keep you consistent throughout the whole process.
A smart beginner approach is to start with a simple character that has clear body proportions and few extras. You can add complexity later once your fundamentals improve.
Modeling the Character: Shape Comes Before Detail
Modeling is where your character starts to take shape. Beginners often jump into fine details too early, but the real priority should be proportion, silhouette, and structure.
Most beginners begin with polygon modeling to build a base mesh. Simple shapes are refined step by step to define the character's body. Sculpting tools are also an option, especially for organic forms, but sculpted models usually need retopology before they can be animated.
When modeling for animation, keep a close eye on:
-
Clean edge loops around joints
-
Even polygon spacing
-
Avoiding stretched or pinched geometry
Good topology lets the model deform smoothly and makes rigging much easier.
Proportions and Silhouette: Why They Matter More Than Detail
For animated characters, proportions count more than surface detail. A clear silhouette helps the audience read movement, even from a distance.
Beginners should regularly check their model in a flat, unlit view to see the silhouette. If the character's pose and body shape are readable without textures or lighting, the design is probably solid.
Overly complex shapes can make animation harder to follow. Simple, clear forms often animate better and look more polished in motion.
Materials and Textures: Supporting the Character, Not Hiding Problems
Once the model is done, materials and textures add visual interest. But beginners should treat this stage as supportive rather than decorative.
Simple colors and materials are often enough for early projects. Overly detailed textures can mask modeling issues and make it harder to judge proportions and deformation.
Textures are applied through UV mapping, which unwraps the model into a flat layout. Materials control how surfaces react to light, like skin softness or fabric roughness.
Testing materials under basic lighting setups helps ensure the character stays readable in different scenes.
Rigging: Preparing the Character to Move
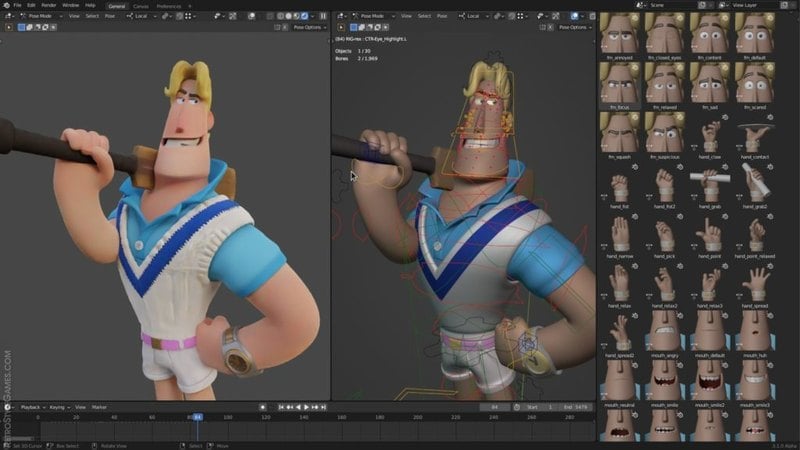
Rigging adds a digital skeleton to the character. Bones control movement, and the mesh is attached to those bones through weight painting.
Good rigging lets joints bend naturally and prevents unwanted distortion. Beginners often rely on auto-rigging tools, which are great for learning and practice. These systems build a basic skeleton quickly, letting users focus on understanding movement rather than constructing complex rigs.
Testing simple poses early on is essential. Raising arms, bending knees, and twisting the torso quickly show whether the model is ready for animation.
Facial Structure and Basic Expression Setup
Even if you don't plan advanced facial animation, understanding facial structure is still important. A face that can't deform properly will feel lifeless.
Basic facial considerations include:
-
Enough geometry around the mouth and eyes
-
Clear separation between facial regions
-
Avoiding overly dense geometry in one area
Beginners can start with simple facial rigs or blend shapes that allow basic expressions. Even subtle eye and mouth movement adds personality to a character.
Animation Fundamentals for Beginners
Animation brings everything together. Instead of moving the mesh, animators move the rig over time.
Key animation ideas beginners should focus on:
-
Clear poses at important moments
-
Balanced weight distribution
-
Smooth transitions between movements
Starting with simple animations is highly recommended. An idle pose, a walk cycle, or a basic turn teaches far more than complex action scenes.
Animation tests also reveal modeling and rigging issues, making them a crucial part of the learning process.
Tools Beginners Commonly Use (And Why Each One Matters)
For beginners, picking the right tools can shape the whole learning experience. Using tools that are too complex too early often leads to frustration, while overly limited tools can slow progress. The goal isn't to gather many tools, but to understand what each tool is best for and when to use it.
Blender: The All-in-One Starting Point
Blender is the most common starting tool for beginners, and for good reason. It combines modeling, sculpting, texturing, rigging, and animation in a single free application. This lets beginners understand the entire character creation pipeline without switching software.
Blender is especially valuable for learning how different stages connect. You can model a character, rig it, animate it, and immediately see how changes in topology affect deformation. This feedback loop speeds up learning.
For beginners, Blender is best used to:
-
Learn basic navigation and modeling
-
Practice clean topology around joints
-
Experiment with simple rigs and animations
Trying to master every feature at once isn't necessary. Focusing on one task at a time builds confidence faster.
Mixamo and Auto-Rigging Tools: Learning Movement Without Rigging Overload
Rigging is often the most intimidating step for beginners. Auto-rigging tools like Mixamo help lower this barrier by automatically generating a usable skeleton for humanoid characters.
Using auto-rigging early allows beginners to:
-
Focus on animation fundamentals
-
Understand how joints affect movement
-
Identify topology issues through motion tests
However, auto-rigging isn't a substitute for understanding rigging. It's best treated as a learning aid. Beginners should still observe how weights behave and how joint placement influences deformation.
Texturing Tools: Keeping Materials Simple on Purpose
Beginners often think good characters need complex textures. In reality, early learning benefits from simplicity. Flat colors and basic materials help highlight modeling and deformation issues.
Basic texture tools inside Blender are often enough for early projects. More advanced tools, such as Substance Painter, become useful later when surface realism matters.
At the beginner stage, texturing tools should be used to:
-
Separate visual elements clearly
-
Support readability in motion
-
Avoid hiding structural problems
How AI Tools Can Support Beginners
AI tools are increasingly useful for beginners, especially outside the core modeling and animation tasks. Their value lies in supporting thinking, planning, and learning, not skipping skill development.
AI for Concept Exploration and Style Direction
AI image tools can generate rough character ideas from text prompts. For beginners who struggle with drawing, this is a powerful way to explore silhouettes, clothing styles, and mood.
These images shouldn't be treated as final designs. Instead, they work like digital mood boards. Beginners can pull ideas such as body proportions or costume layers and adapt them into original models.
AI as a Learning Assistant
Text-based AI tools are particularly useful when beginners run into unfamiliar terms or confusing steps. Concepts like edge flow, weight painting, or deformation issues can be explained in simple language, helping learners understand why something went wrong instead of blindly copying tutorials.
Used correctly, AI shortens the gap between confusion and understanding.
What AI Should Not Be Used For
AI can't create production-ready topology, reliable rigs, or expressive animation. Beginners who rely on AI to generate final assets often struggle later because they miss foundational skills.
The healthiest mindset is to use AI as:
-
A guide
-
A clarifier
-
A planning assistant
Not as a shortcut.
A Detailed Beginner Workflow You Can Actually Follow
Many beginners fail not because they lack talent, but because they lack a repeatable process. Below is a practical workflow that reflects how learning actually happens.
Step 1: Define a Small, Clear Goal
Instead of "I want to make a cool character," choose something specific:
-
A character that can stand and idle
-
A simple walk cycle
-
A basic expressive pose
Clear goals prevent scope creep.
Step 2: Gather References With Purpose
References aren't about copying. They're about understanding proportions, anatomy, and structure.
Good reference sets include:
-
Front and side body proportions
-
Clothing folds and materials
-
Simple pose examples
AI-generated images can supplement references, but real-world photos remain essential.
Step 3: Model a Clean Base Mesh
At this stage, avoid sculpting fine details. Focus on:
-
Correct proportions
-
Clean edge loops
-
Logical joint areas
The base mesh should look simple but balanced.
Step 4: Apply Temporary Materials
Use simple colors to separate body parts and clothing. This improves readability and helps spot proportion problems early.
Step 5: Rig Early and Test Often
Rigging should happen earlier than most beginners expect. Even a basic auto-rig reveals whether your model is animation-ready.
Test:
-
Arm raises
-
Knee bends
-
Torso twists
Fix issues immediately.
Step 6: Animate One Simple Action
Choose one small animation:
-
Idle breathing
-
Weight shift
-
Short walk loop
This step connects everything you have built so far.
Step 7: Reflect and Iterate
Review what worked and what broke. Every character teaches lessons that apply to the next one.
Iteration is progress, not failure.
Animation vs Game Characters: Why Beginners Should Focus on Animation First
Beginners often wonder whether they should learn game characters or animation characters. Animation characters emphasize deformation quality and expressive movement, which builds strong fundamentals.
Game-specific constraints like polygon budgets and optimization are easier to learn once animation fundamentals are solid.
How to Know When a Character Is Ready for Animation
A character is ready when:
-
Joints bend without collapsing
-
Proportions feel balanced in motion
-
Simple poses look natural
If these conditions aren't met, return to modeling or weighting before continuing.
Final Thoughts: Learning to Animate Characters Is a Process
Creating 3D characters for animation isn't about shortcuts. It's about understanding movement, structure, and iteration.
Start simple. Practice often. Finish projects.
Your skills will grow faster than you expect.